

How To Connect Ip Camera To Router
Notation :Please ensure that you lot tin view the photographic camera on the desktop or laptop when the photographic camera is connected to the router via Ethernet cable.
Stride ane
Use an Ethernet cable to connect the photographic camera to the LAN port of the wireless router first. We need wired connection to configure the photographic camera at the very starting time.
Stride ii
On a desktop or laptop which is connected to the same wireless router, openIntelligent IP Installer(yous can find it in the Resource CD) and so highlight your photographic camera.
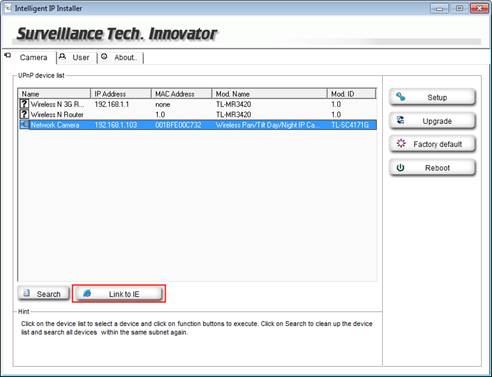
ClickLink to IE button, IE volition automatically started and the login window will be prompted.
Type the username and password in the login folio (the default username and countersign both areadmin), then click OK to connect to the device, you will be able to run into the spider web configuration interface.
Annotation: If yous changed the username and password before and forgot the username and countersign, delight click here to reset the camera to default settings and and so reconfigure the camera.
Or as at present you know the IP address of the camera, you lot can manually type in the IP address in the address bar of other web browser such as IE, Firefox, Chrome or Safari. Here we just have IE every bit an case.
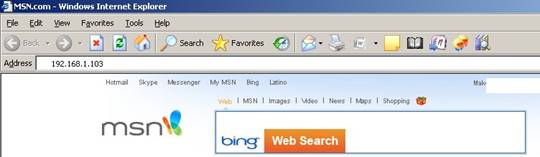
If you have inverse the default port 3333, you have to add the port number after the IP accost (we have 192.168.i.103:3333 as an example), click
hereto find out the port number of TP-Link IP Camera.
Step 3
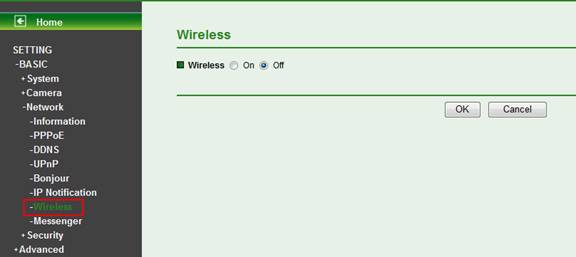
Become toSETTING->BASIC-> Network->Wirelesspage. To enable wireless office, check the optionon.
Step 4
ClickRefreshpush, all the available wireless APs will be listed in the wireless network box. Highlight on your wireless router'south network name. Then fill in following content:
i. Select the correspondingHallmark,Encryption and type in the correctPassphraseor password which should match with the wireless settings in your wireless router.
Our camera could observe the basic wireless settings (Authentication, Encryption) of your wireless router. If you lot are not sure about the laissez passer-phrase, please contact with the technique support of your wireless router.
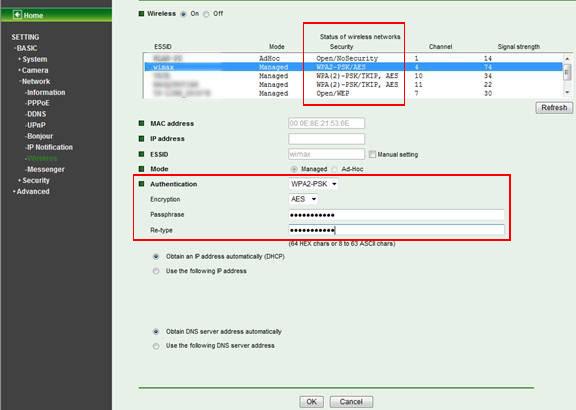
Note: Under special cases, you cheque WPA-PSK/WPA2-PSK option on your wireless router and choose Automatic for the Version, Automatic for the Encryption.
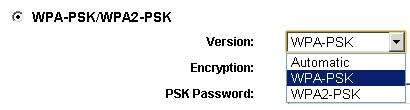
But nosotros just have WPA-PSK or WPA2-PSK to choose for the Authentication, and AES or TKIP for the Encryption on the camera.
Nosotros do suggest you choose the detected Authentication and Encryption shown on the photographic camera page. If convenient for you, nosotros hope you could set the Authentication and Encryption on the wireless router.
ii. SelectObtain an IP address automatically (DHCP) andObtain DNS server addresses automatically.ClickOKand the camera volition start to connect to the router wirelessly.
.jpg)
Footstep five
Go to SETTING ->Basic->Initialize, then Click Reboot button to reboot this IP Camera. A confirmation dialogue will announced and so click OK to procedure. It takes two minutes to reboot this IP Camera.
Footstep half-dozen
After connect successfully, you cancheque the IP address assigned by the wireless router. In that location are mainly three methods you lot can employ to check it.
Method 1:You can run intoIP address comes up in the wireless setting folio of the IP camera.
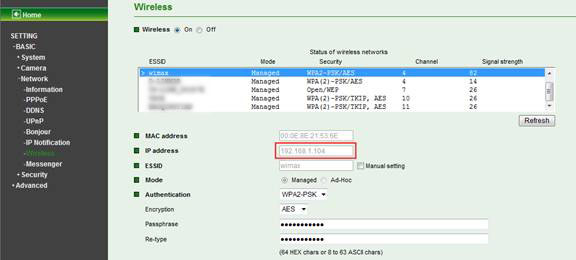
Equally y'all see from the flick, it'south a new IP address 192.168.one.104, dissimilar from wired IP address 192.168.ane.103.
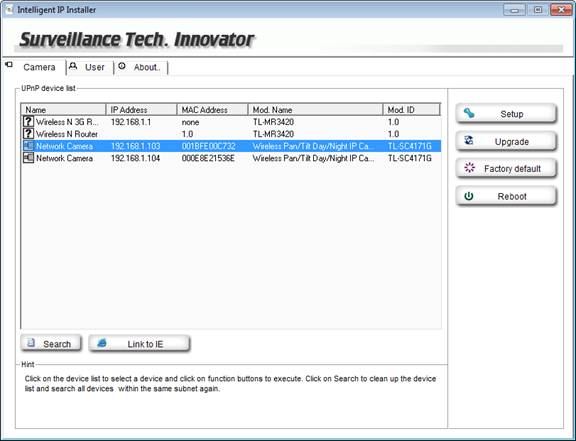
Method two: UseIntelligent IP Installer. A new IP accost comes up in the list after the IP camera was connected to the wireless router successfully.
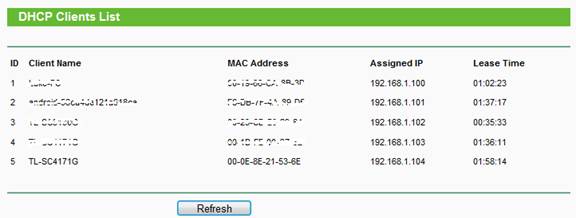
Method 3:Check the DHCP clients list in the web direction page of your wireless router.
InStep 4, you can also assign a fixed IP address for the camera. Just choose use the post-obit IP address and enter IP address, subnet mask, gateway and DNS information accordingly. Just keep in mind that the IP address you assigned to the camera should not exist taken past other devices in your home network.

Stride 7
Unplug the Ethernet cable from the photographic camera to the router. And the photographic camera is now connected to wireless router wirelessly.
Open the web browser and type the IP address (we accept 192.168.1.104 every bit an example here) yous check in the stride 6 into the accost bar and then Press Enter, at present yous tin can use any of your desktop and laptop in the network to view the camera as well.

Is this faq useful?
Your feedback helps improve this site.

Source: https://www.tp-link.com/sa/support/faq/330/
Posted by: lermalaithy.blogspot.com
0 Response to "How To Connect Ip Camera To Router"
Post a Comment